Embed this infographic
Want to share this on your site? Copy the code below.
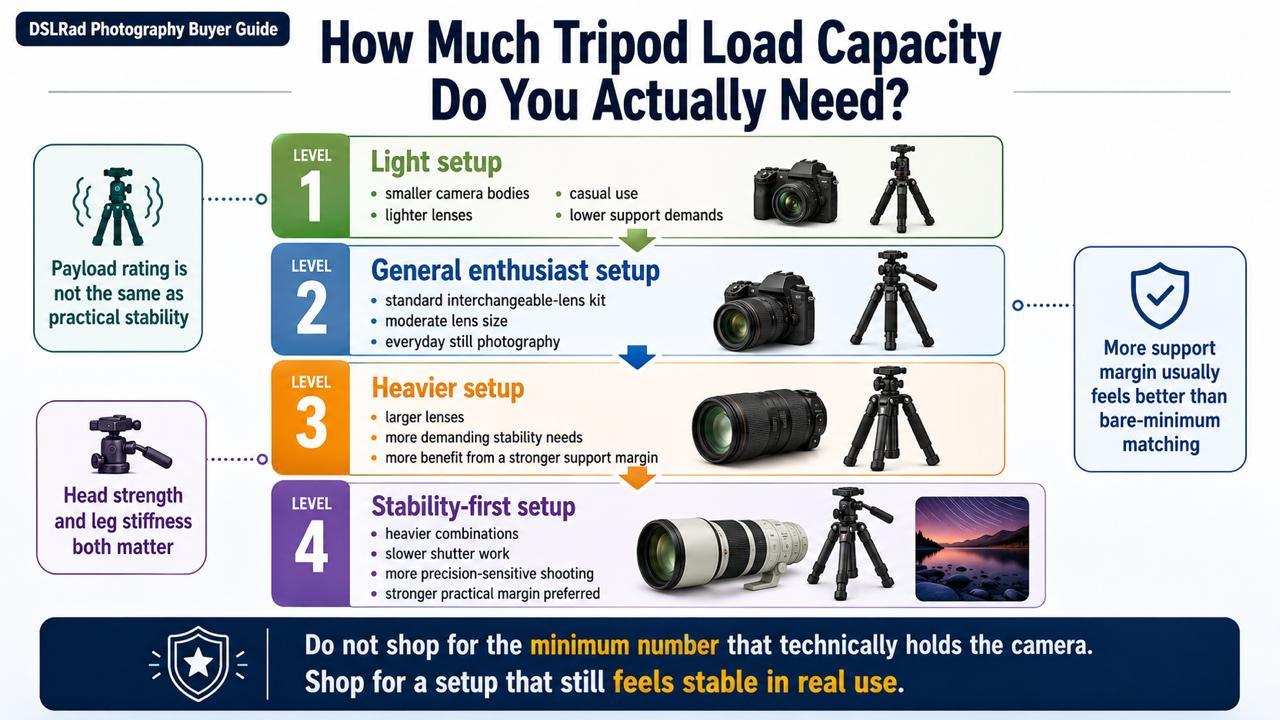
If tripod specs make this feel simpler than it really is, that is not your fault.
A load rating looks like a clean answer. Your camera setup weighs one number, the tripod is rated for a bigger number, and the problem looks solved.
But that is not how tripod support works in the real world.
A tripod can be rated to hold your setup and still be a poor match once you add a longer lens, raise the center column, angle the camera off-center, or try to work outside in less forgiving conditions.
That is why the better question is not just “What does my camera weigh?”
It is “What kind of margin does my actual setup need to stay usable?”
Table of contents
- Quick answer
- What counts toward your real tripod load
- Tripod legs vs tripod head, why both ratings matter
- Why stated payload is not the same as practical stability
- A practical headroom guide by setup type
- When you need more margin than the simple math suggests
- When more payload does not solve the real problem
- How to read manufacturer tripod specs without getting fooled
- Worked examples without turning this into a roundup
- Final buying checklist
Quick answer
A practical tripod load-capacity decision starts with your full mounted setup, not just the camera body.
That means you should account for:
- the camera body
- the heaviest lens you realistically plan to mount
- accessories that stay on the setup
- the tripod head, if the stated rating applies to legs only
- the fact that off-center weight, longer lenses, center-column use, and shooting conditions can make a technically acceptable rating feel much worse in use
So yes, a tripod should comfortably exceed your real setup weight.
But no, the published payload number is not the whole story.
That is why many photographers use extra headroom instead of shopping right up to the stated limit. The important part is understanding that headroom is a buyer shortcut, not a universal law.
What counts toward your real tripod load
One of the easiest buying mistakes is to think only about camera-body weight.
What actually matters is the full setup the tripod is expected to support.
That can include:
- camera body
- mounted lens
- battery grip
- microphone
- monitor
- flash or small light
- quick-release plate or bracket
- tripod head, when you are checking tripod legs separately
This is also where travel setups and DSLR setups can drift apart.
A light mirrorless body with a small lens may not ask much from a tripod. A DSLR with a heavier zoom, grip, or longer telephoto can change the support requirement quickly, even before you start thinking about how the setup balances.
Tripod legs vs tripod head, why both ratings matter
Tripod buyers often focus on the leg set and forget that the head may be the weak point.
That is a mistake.
A stronger set of legs does not fix an undersized head.
Really Right Stuff’s ball-head guidance makes this clear in practical terms: head load ratings should comfortably exceed the total weight of the camera, heaviest lens, and accessories, and a head that is too small can lead to creep, vibration, and less precise control, especially with telephoto lenses.
That matters because a setup can technically fit the leg rating while still feeling frustrating at the head.
Common problems include:
- creep after locking the head
- imprecise framing when the camera is angled off-center
- more visible vibration with longer lenses
- less confidence when using a heavier setup at full extension
If you are buying legs and head separately, treat the lower-performing part as the real limit.
Why stated payload is not the same as practical stability
Embed this infographic
Want to share this on your site? Copy the code below.
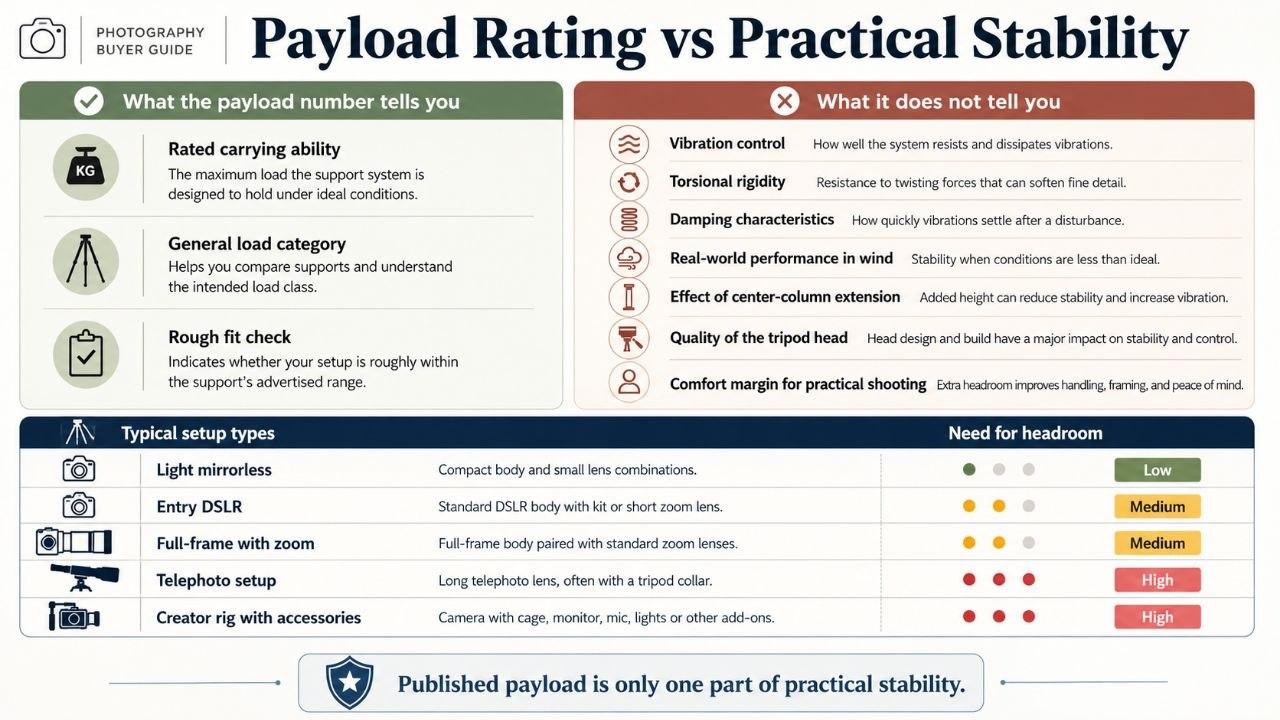
This is the part many simple buying guides blur together.
A payload number tells you something useful. It does not tell you everything you need to know about real support quality.
Manfrotto’s safety-payload explanation is helpful here because it separates a certified safety-payload value from a broader max-payload idea and explicitly says that certified values come from lab testing that cannot be recreated at home or converted from ordinary payload ratings with a simple formula.
That matters because published numbers do not automatically answer questions like:
- how well the setup resists vibration
- how a longer lens shifts the center of gravity
- how much the center column changes the feel of the tripod
- how much confidence you have when the camera is angled away from center
- how the tripod behaves once you leave calm indoor conditions
A tripod may be able to hold a setup without being the tripod you actually want to use with that setup.
That is a big difference.
A practical headroom guide by setup type
This is where many pages force a fake formula.
A better approach is to think in setup categories and add margin based on how demanding the setup really is.
Light setup
Examples:
- phone with adapter
- action camera
- small mirrorless body with compact lens
- light creator setup with minimal accessories
This is the category where lighter support options can make sense, especially if portability matters more than maximum stiffness.
Mid-weight everyday camera setup
Examples:
- entry DSLR with kit lens
- mirrorless body with a standard zoom
- travel camera plus small mic or accessory
This is where payload ratings can still look comfortable on paper, but the quality of the head and the way the setup balances start to matter more.
Heavier stills setup
Examples:
- DSLR with a brighter standard zoom
- full-frame body with a larger zoom
- camera setup that spends more time angled for portraits or off-center compositions
This is where more headroom becomes more important. Not because there is one magic multiplier, but because leverage, creep, and vibration become more obvious when the setup gets heavier and longer.
Longer-lens or telephoto setup
Examples:
- DSLR with a 70-200mm style lens
- heavier wildlife or sports-style lens setups
This is where buyers get in trouble by trusting the payload number too literally. A long lens changes how the weight behaves, not just how much it weighs.
In practical buying terms, this is the category where you should be much more conservative.
Video or creator setup with extras
Examples:
- camera, mic, small light, monitor, or cage
- talking-head setup that stays assembled
- compact vlogging kit that is light but awkwardly balanced
Even when the total weight is not huge, the added accessories can shift the balance enough that a light tripod or a weaker head feels worse than the raw number suggests.
When you need more margin than the simple math suggests
This is the real buyer question.
You usually want more margin when:
- the lens is longer and pulls the balance forward
- the head is working at more awkward angles
- the center column needs to be raised often
- you plan to shoot outside where movement is harder to control
- the tripod is tall for your setup and spends more time near full extension
- you are mounting extra accessories that make the rig less tidy
- you want a smoother, less frustrating experience instead of merely acceptable support
This is why blanket advice like “just buy one rated for X” tends to disappoint people.
The tripod may not fail. It may just feel worse than expected.
When more payload does not solve the real problem
A bigger load rating is not a cure-all.
Sometimes the real issue is:
- a weak or undersized head
- too much reliance on the center column
- a tripod that is tall on paper but less confidence-inspiring at full height
- leg sections that get too thin low down
- a tripod that is so heavy and awkward that you stop bringing it
This is also where buyers overspend.
If a tripod is technically stronger but too big, too heavy, or too annoying to carry, that higher rating may not help much in practice.
So the goal is not “buy the highest number you can afford.”
The goal is “buy the lightest tripod that still gives your real setup enough margin to be practical.”
How to read manufacturer tripod specs without getting fooled
When you compare tripods, do not stop at the payload figure.
Check:
- tripod-leg rating
- tripod-head rating
- maximum height
- height without the center column fully raised, if available
- folded length
- tripod weight
- whether the setup is clearly a travel tripod or a fuller-size support option
This matters because a tripod can look impressive in one dimension while hiding compromises in another.
For example:
- a travel tripod may have an acceptable payload figure but a smaller head and more compromise at height
- a taller tripod may hit its maximum height only with the center column raised
- a stronger head may matter more than a small jump in leg payload for some setups
Worked examples without turning this into a roundup
Example 1: beginner DSLR with kit lens
This is often where a moderate-support tripod can make sense, provided the head is not a weak afterthought and the tripod is not being pushed to awkward angles constantly.
Example 2: DSLR with heavier zoom
This is where more margin starts to matter more, because the setup weight rises and the balance usually gets less forgiving.
Example 3: creator setup with camera, mic, and light
The total weight may still look modest, but the accessories can make the setup more awkward than the spec sheet suggests. That is a good example of why the payload number alone is not enough.
Example 4: longer-lens setup
This is the category where conservative buying usually makes the most sense. A tripod that barely clears the raw weight number is often the wrong way to think about it.
Final buying checklist
Before you buy, ask:
- what is the full mounted weight of my real setup?
- am I checking both the leg rating and the head rating?
- is this a compact travel setup or a heavier DSLR / longer-lens setup?
- will I often raise the center column?
- do I care more about portability or a stronger margin?
- is the tripod likely to be used indoors, outdoors, or both?
- am I buying the lightest tripod that still gives enough practical headroom?
If you already know your load range and just need shortlist options, see the general camera tripod picks.
If you are shopping specifically around a heavier DSLR kit, compare DSLR tripods with enough capacity for larger lenses.
If your setup is more creator-oriented, with a lighter camera plus accessories, it also helps to choose a vlogging tripod that can handle your camera, mic, and light.
If you want to narrow the choice further, it also helps to look at whether aluminum or carbon fiber makes more sense, which tripod head style fits the way you shoot, and whether a travel tripod or full-size tripod is the better fit.
The main thing to remember is simple:
Tripod payload is useful, but it is not the whole answer.
Use it as a buying clue, then judge the rest of the support system like it matters, because it does.